Navigational Widgets
Overview
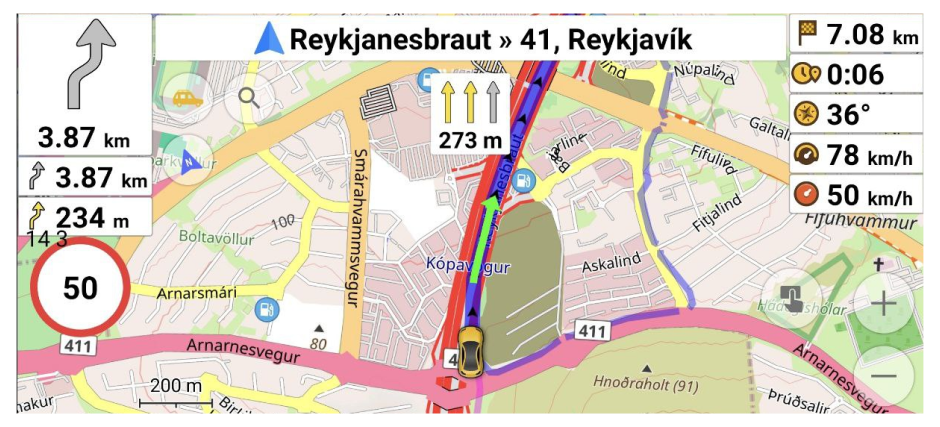
Navigational widgets are enabled during navigation to display information such as distance, arrival or left time, next turns, bearing, current street name, lanes information, max speed, approaching alerts, POIs, waypoints.
Active and passive navigation
Navigational widgets are mostly used with active or passive navigation with navigational profiles, so they are not available in Browse Map profile.
Active navigation requires to set a destination, calculate the route (Directions) and start navigation (Go), not necessary with voice guidance. All navigational widgets support that type of navigation.
Passive navigation doesn't require to have a destination point set and works automatically once you switch to any navigational profile, for example 'Driving'. In that case application will try to determine which road you are following and display extra information about it i.e. name, lanes info, max speed available. Please note that this approach is quite unreliable and doesn't support all features.
Elevation widget
 This widget you can use only with Pro feature OsmAnd Pro subscribers.
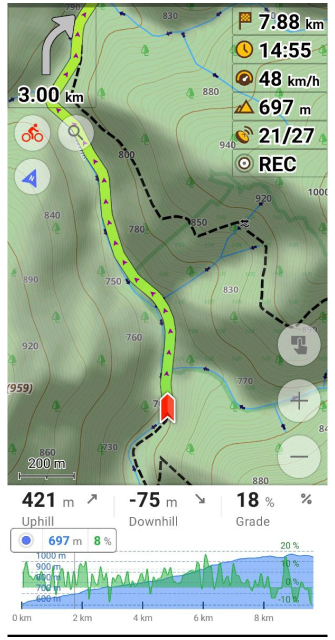
The Elevation widget shows a graph with the elevation and slope of your navigation route and your current location on this graph with current altitude and slope. The graph is plotted on two axes. The X-axis is the distance of your route. The Y-axis is the altitude, the value depends on the relief, and the slope displayed as a percentage.
- Android
- iOS
Menu → Configure screen → Bottom panel → Available widgets → Elevation profile
Interactions with the graph
- Zoom in/out. By default, the graph shows the route from the current location up to 10 km ahead. You can use two-finger movement to zoom in and out for a more detailed view of altitude changes on your route. You can also move the graph to the right, forward on the route, and backward to the current location.
- Place a point on the graph. If you want to see the altitude and degree value at a particular point ahead on your route, you can tap anywhere on the graph and a pointer with the values will appear.
What's in
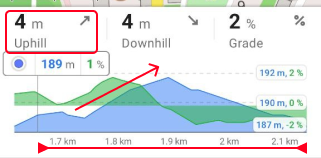
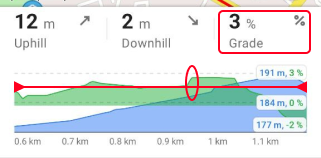
When you select a route and press the Start button, the map opens with your current location, the route on it and the widget at the bottom of the screen. On the widget you can see the graph and information about Uphill, Downhill, Grade, distance, altitude, slope angle. You can select the optimal scale and see all possible obstacles on your route.
All values are indicated either for the whole route or only for the selected interval by scaling the graph.
| Location Pin |
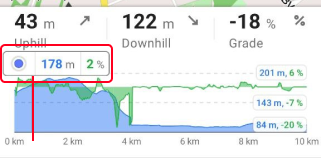
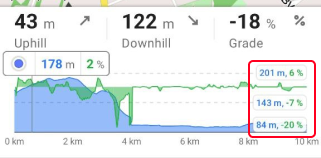
| The data on the graph of your Current location contains the location icon, altitude, and percent slope value. The right side of the widget contains data about the highest altitude and slope, the average value for both and the lowest altitude and slope on the selected route section visible on the graph. |
 |
| Additional information |
| The right side of the widget contains data about the highest altitude and slope, the average value for both and the lowest altitude and slope on the selected route section visible on the graph. |
 |
| The Uphill and Downhill values are the sums of the distances from your location point to the end of the visible graph. If there is no location point on the graph, then it is the sum of the entire visible graph on the screen (this can happen when you change the scale and the location goes outside the graph). |
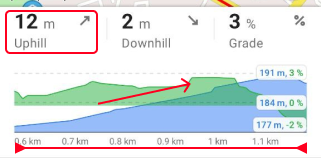
| "Uphill" – shows the sum of the all distances with increasing altitude from your location point to the end of the visible graph or for the selected section of the route without location point visible on the screen. |
  |
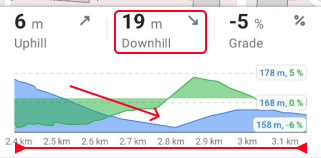
| "Downhill" – shows the sum of the all distances with decreasing altitude ffrom your location point to the end of the visible graph or for the selected section of the route without location point visible on the screen. |
  |
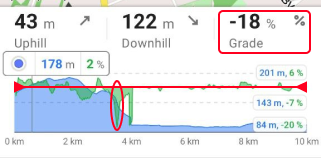
| Grade is is the ratio of the path to the horizontal, where zero indicates horizontality and the number of degrees indicates a higher or steeper degree of slope. |
| "Grade" – shows the maximum road slope in percent from your location point to the end of the visible graph or for the selected section of the route without location point visible on the screen. |
  |
This feature doesn't exist for iOS version of OsmAnd.
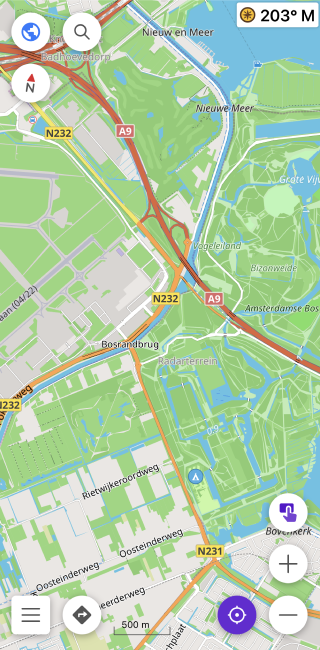
Bearing widget
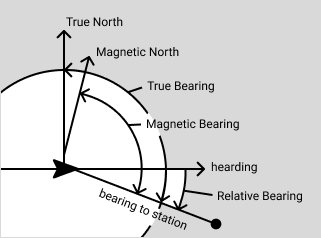
Bearing is the direction to a target outside your vehicle, such as a destination or point of origin. A bearing can be Relative (according to your course), Magnetic (according to the compass). For example, a magnetic bearing of 180° is the direction to the south, and a relative bearing of 180° is directly behind you. The cardinal points are the four main directions of the compass. They are North (N - 0° or 360°), East (E - 90°), South (S - 180°), and west (W - 270°).
- Android
- iOS
| Enable | Android: Menu → Configure screen → Widgets → Left/Right/Top/Bottom panels → Bearing |
| iOS: Menu → Configure screen → Widgets → Left/Right/Top/Bottom panels → Magnetic bearing or Relative bearing | |
| Format | Android: You can change the data display format for angular units: Menu → Configure profile → General settings → Units & formats → Angular unit |
| iOS: You can change the data display format for angular units: Menu → Settings → App profiles → General settings → Units&formats → Angular measurement units |
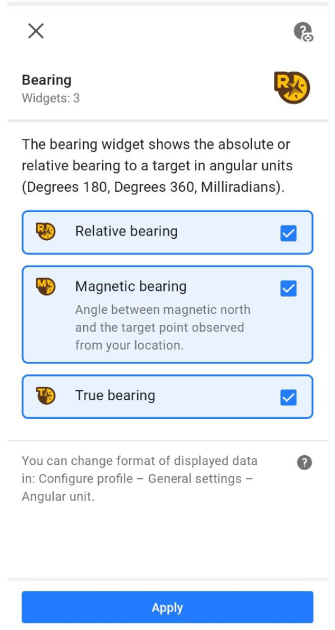
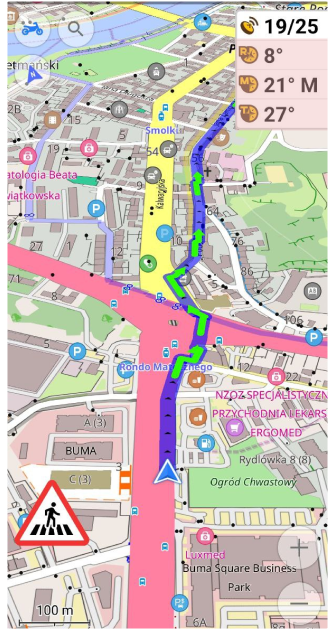
How it works
In order to display the bearing, a target point must be selected. If a destination point (or the first intermediate point, if there is one) is selected for navigation, it will be used as the target point. Otherwise, the topmost selected marker will be used.
Relative bearing is the angle between your forward movement direction and the target point. The forward movement direction is either the direction of your movement obtained from the GPS sensors or if you are standing where you have pointed your device (i.e. the orientation of your device according to its magnetic compass). Example: An object with a relative bearing of 0° is directly in front of you and an object with a relative bearing of 180° is directly behind you. The relative bearing is the angle between your forward direction and the target point.
Magnetic bearing is the clockwise (horizontal) angle between the magnetic north and the target point observed from your location. It is the magnetic compass value that you must follow in order to reach that target. Example: If the magnetic bearing is shown as 0° M, you need to move strictly towards the magnetic north to reach the target point.
True bearing is expressed as the horizontal angle between the geographic meridian and a line on Earth. Specifically, true point bearing is the angle measured in degrees clockwise from the True North line. OsmAnd software will show you the true bearing and hearding in our user-friendly interface, making it easy for you to make the right decision early on.
Navigation along the rhumb line
- Relative bearing. If you stick to a relative bearing of 0 degrees and move forward, you will arrive at the destination point, but not by the shortest route ( Rhumb line ).
- Magnetic bearing. If you align the compass on your boat/vehicle with the widget value and head forward, you will arrive at your destination, but not by the shortest route ( Rhumb line ).
Navigation points
Navigation point widgets show the remaining distance to a destination, intermediate point, arrival time to an intermediate point, or travel time for a calculated route.
Distance to destination
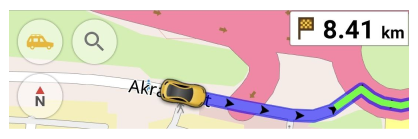
The widget displays the distance left to the last destination point when following a calculated route.
| Enable | Android: Menu → Configure screen → Widgets → All panels → Distance to destination |
| iOS: Menu → Configure screen → Widgets → Left/Right/Top/Bottom panels → Distance to destination | |
| By tapping | Moves the map to the destination point. |
Distance to intermediate
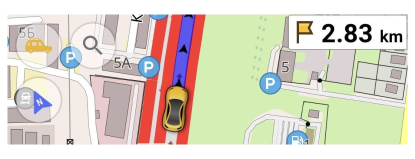
The widget shows the distance to the first intermediate point along the calculated route. After passing intermediate points, the space will be updated to the next intermediate point. If there are no intermediate points, the widget is not displayed.
| Enable | Android: Menu → Configure screen → Widgets → Left/Right/Top/Bottom panels → Distance to intermediate* |
| iOS: Menu → Configure screen → Widgets → Left/Right/Top/Bottom panels → Distance to intermediate | |
| By tapping | One intermediate point - move the map to the intermediate point. Two or more intermediate points - opens Destinations list menu. |
Time to intermediate
- Android
- iOS
The widget shows the Arrival time or Time to go to the first intermediate point. During navigation, the time is constantly updated, and as soon as an intermediate point is passed, the time will be updated to the next one. For example, if you stop navigation, the Time to go will remain unchanged and the Arrival Time will be equal to the Time to go plus the Current Time.
| Enable | Android: Menu → Configure screen → Widgets → Left/Right/Top/Bottom panels → Time to intermediate |
| iOS: Menu → Configure screen → Widgets → Left/Right/Top/Bottom panels → Time to intermediate | |
| By tapping | Changes between Arrival time to Time to go and the reverse. |
Time to destination
- Android
- iOS
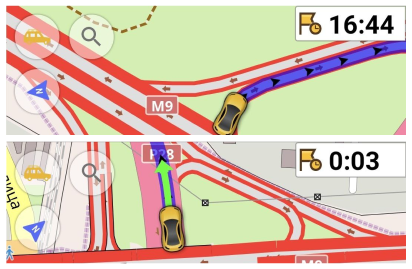
The widget shows the Arrival time or Time to go to the last destination point. The time is constantly updated during navigation and is equal to the route time from your current location.
| Enable | Android: Menu → Configure screen → Widgets → Left/Right/Top/Bottom panels → Time to destination |
| iOS: Menu → Configure screen → Widgets → Left/Right/Top/Bottom panels → Time to destination | |
| By tapping | Changes between Arrival time to Time to go and the reverse. |
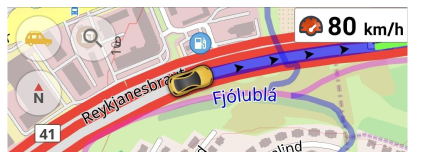
Speed limit
Widget displays the speed limit on the current road you are traveling on. It works in passive and active navigation mode. Data is taken from OpenStreetMap project.
| Enable | Android: Menu → Configure screen → Widgets → Left/Right/Top/Bottom panels → Speed limit |
| iOS: Menu → Configure screen → Widgets → Left/Right/Top/Bottom panels → Speed limit | |
| By tapping | No changes |
Route maneuvers
This set of navigational widgets is activated during navigation and display information about the distance to the next maneuver.
| Enable | Android: Menu → Configure screen → Left / Right panel → Next turn, Next turn (small), Second next turn |
| iOS: Menu → Configure screen → Widgets → Left / Right panel → Next turn, Next turn (small), Second next turn | |
| By tapping | If voice prompts are enabled, the next maneuver and the distance to it are pronounced. |
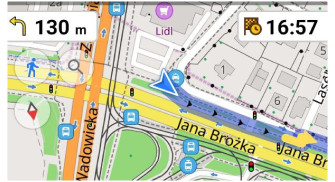
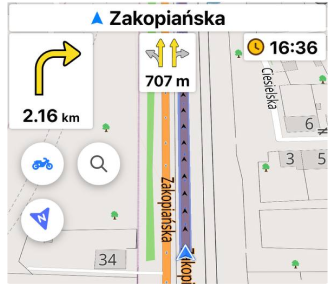
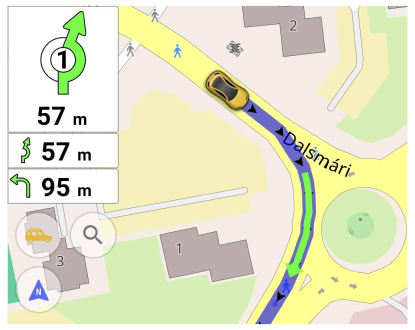
Next turn

Route maneuvers widgets include:
- Next turn. The widget shows information about the next turn with a large arrow representing the maneuver and with data about the distance to it.
- Next turn (small). The widget shows information about the next turn with a small arrow representing the maneuver and with distance data next to the arrow.
- Second next turn. The widget shows information about the next Next Turn after the first one, which is activated if the turn is in approach distance.
Displayed time on widgets
The table shows the approximate times for activating the prompts, read more in the technical documentation or in the article Voice prompts. The color of the arrows indicates the remaining time to make the maneuver. The appearance of the arrows can be used if you do not want to use voice prompts.
| ~ Trigger Time | Distance | Prompt type | Color |
|---|---|---|---|
| 5 seconds | Close by | Turn now | 🟢 Green |
| 20 seconds | Approaching | Turn in X m | 🟡 Yellow |
| > 100 seconds | Distant | Prepare to turn | ⚪ Grey |
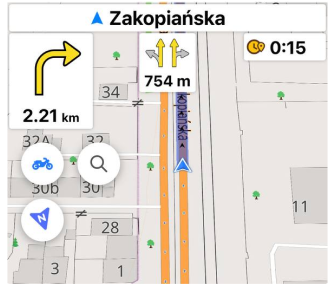
Lanes
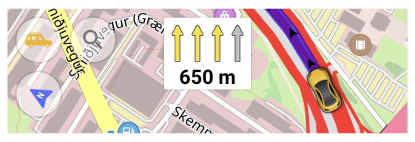
The Lanes widget displays the lane layout for the current road and highlights lanes when navigation is active. In passive navigation, widget displays the lane layout for the current road. The data is taken from OpenStreetMap project.
| Name | Prompt type | Color | ~ Trigger Time |
|---|---|---|---|
| Close by | Turn now | Green | 5 seconds |
| Approaching | Turn in X m | Yellow | 20 seconds |
Displays a widget by approach time settings. Lanes color is associated with voice prompts and time remaining to perform the maneuver.
| Enable | Android: Menu → Configure screen → Widgets → Top panel/Bottom panel → Lanes |
| iOS: Menu → Configure screen → Widgets → Top panel/Bottom panel → Lanes | |
| By tapping | No changes |
Alert widget
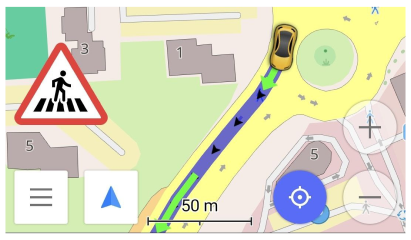
The Alert widget combines several types of alerts that are displayed in the lower left corner while you are navigating.
You have the ability to turn alerts such as Speed limit, Traffic warnings, Pedestrian crosswalks, Speed cameras, and Tunnels on and off. Other alerts are active by default if the widget is enabled.
For the Speed Limit alert type, you can adjust the Speed limit tolerance value in the voice prompt settings to better match the vehicle speed and GPS speed.
Most alerts are displayed on the screen and announced by voice prompt for 15 seconds, as well as the trigger time for passing a Waypoint, Favorite point, or POI. Read more here.
| Enable | Android Menu → Configure profile → Navigation settings → Screen alerts |
| iOS Menu → Settings → Configure profile → Navigation settings → Screen alerts |
Alert types
Alert types have different visual design, which depends on the Driving region and can be configured through Settings → General settings. OsmAnd does not aim to represent 100% identical road signs but points out some similarities.
| Name | Description | Icon |
| Traffic warnings | Traffic calming uses physical design and other measures to improve safety for motorists, pedestrians and cyclists. |   |
| Pedestrian crosswalks | A pedestrian crossing (primarily British English) or crosswalk is a place designated for pedestrians to cross a road, street, or avenue. OsmAnd shows the alert of uncontrolled pedestrian crossing. |   |
| Speed limit | In most countries the Road speed limits are used to set the legal maximum, middle or minimum speed at which road vehicles may travel on a given stretch of road. In OsmAnd the alert is shown when you exceed the speed. You can set parameters of speed exceeding (0, 5, 10.. km/h). 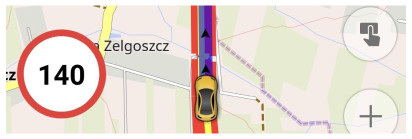 |    |
| Tunnels | A tunnel is an underground passageway, esp cars that pass under a mountain, river, or a congested urban area. In OsmAnd the alert Tunnels has information about tunnel length. If you are in a tunnel it shows distance to the end of the tunnel.  |   |
| Speed cameras | Traffic enforcement cameras and speed cameras record traffic offenses, including speeding, running red lights, and other types of illegal behavior. NOTE: Speed camera alerts are prohibited or illegal in some countries. To completely remove speed cameras from OsmAnd, go to main Menu → Settings → OsmAnd settings → Legal → Uninstall speed cameras |  |
| Stop sign | A stop sign is a traffic sign designed to notify drivers that they must come to a complete stop and make sure the intersection is safely clear of vehicles and pedestrians before continuing past the sign. |  |
| Railroad crossings | This warning means that there is a railway crossing ahead. |    |
| Border control | This warning indicates that border control is ahead. |  |
| Border control | Hazard symbols or warning symbols are recognisable symbols designed to warn about hazardous or dangerous materials, locations, or objects, including electric currents, poisons, and radioactivity. |   |
| Toll booth | This warning indicates that a toll booth for a toll road is ahead. 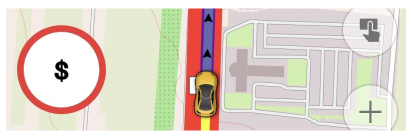 | |
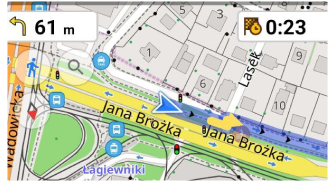
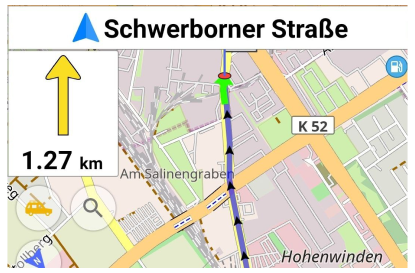
Street name
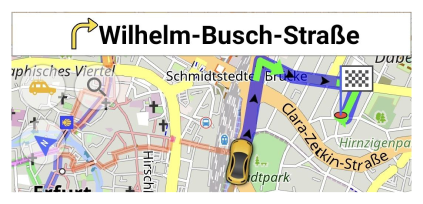
The Street name widget shows the current street name with a straight arrow or the next street name with the maneuver to be performed. The street name usually consists of a highway shield, a name, a ref, an internation ref, and a destination. Switching between the current street name and the next street name happens when you approach the place where you want to perform the maneuver (~20 seconds), similar to the voice prompt Turn in X m.
- When driving along a street or highway, the widget shows the name or designation of the current street (road) with a blue arrow.
- When you change direction, the widget shows the scheme of the maneuver and the name (designation) of the street (road) to which you need to turn.
| Enable | Android: Menu → Configure screen → Widgets → Top panel/Bottom panel → Street name |
| iOS: Menu → Configure screen → Widgets → Top panel/Bottom panel → Street name | |
| By tapping | No changes |
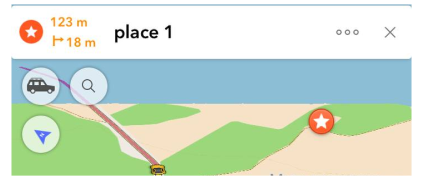
Approach POIs/Favorites
Approach POIs/Favorites/Waypoints widget is combined with Street name and displays approaching and passing Points of interest, Waypoints of followed track, Favorites along the route. It displays name, icon of the point and 2 distances: route distance and deviation distance. Route distance (top) displayes how much distance needs to be covered by following route, deviation distance is a straight distance from the closest route point to the point itself.
Android:
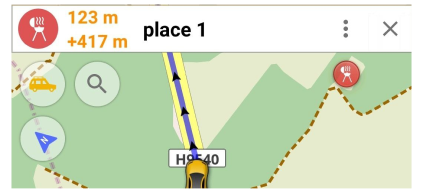
iOS: in addition to the distance from the nearest route point, the side (left or right) of the route where point is located is also shown.
| Enable | Android Menu → Directions → Settings → Show along the route → Points of interest (POI), Favorites, Traffic warnings iOS Menu → Start navigation → pencil button |
Related Articles
- Configure Screen
- Map buttons
- Informational widgets
- Navigational widgets
- Radius-ruler and Ruler
- Marker widgets
- Quick Action
This article was last updated in May 2024