Plan a Route
Overview
The Plan a route (Menu → Plan a route) tool is a powerful feature of the OsmAnd application that allows you to create new routes as GPX tracks, edit and add new segments to already saved tracks, measure distances on the map, and attach track segments to the nearest available road using different navigation profiles. The feature is designed to work in offline mode.
A route consists of a set of segments between specified points. The segments can be straight lines or routes adapted to the selected profile. The route can be saved as GPX for later import, edit, and navigation.
- Android
- iOS
Main Use Cases
- Android
- iOS
Go to: Menu → Plan a route
Go to: Menu → Plan a route
Create New Route
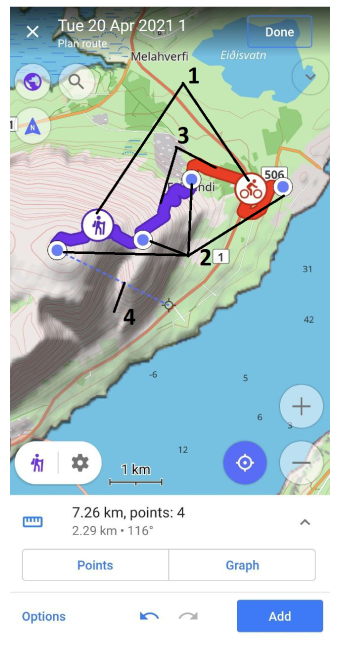
To create a new track in GPX format, use the main function of the Plan a route tool. Pre-creating a route has many advantages, unlike recording the current track with Trip recording plugin. You can add as many points as you want to the route, delete and move them, change route types by segments, and get detailed information about the route.
By default, the routing type will match the previously selected profile, tap the routing icon to select how the application should calculate the segment to connect points. The available profile should be configured separately.
You can zoom in and out for easy placement of points when creating or editing a track. When you zoom out, the points on the track become invisible for a better view of the entire length of the track and the map as a whole. Only the last added point and the pointer for adding the next point remain visible.
Modify Existing GPX Track
- Android
- iOS
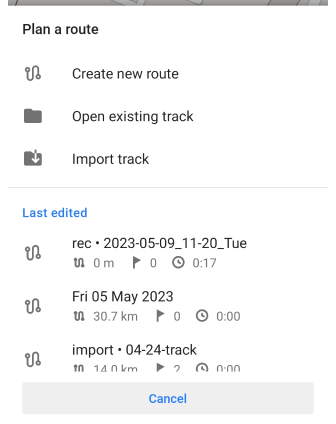
Go to: Menu → Plan a route → Open existing track / Import track
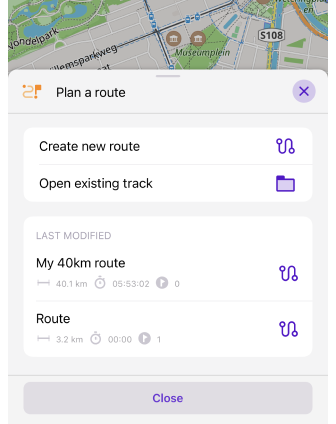
Go to: Menu → Plan a route → Open existing track
Plan a route tool allows modifying existing GPX track as well as an imported track. However, in case you need to exclude large amount of points based on generic criteria, GPS filter might be a more suitable tool.
Distance Measurement
- Android
- iOS
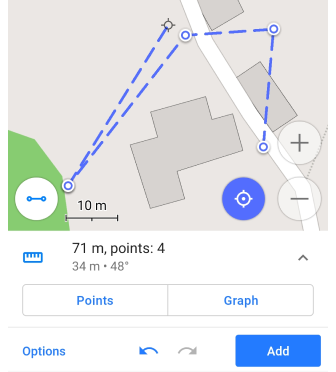
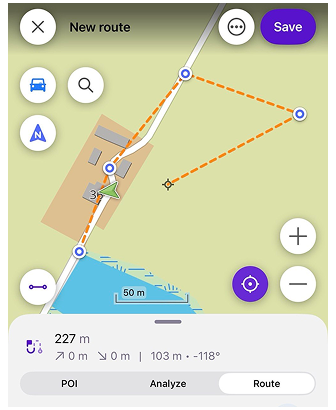
Plan a route is a quick and easy way to measure the distance between points.
- Select the Straight line method of route planning. A dashed line will be drawn between the points.
- Add the first point on the map from which the line will be drawn.
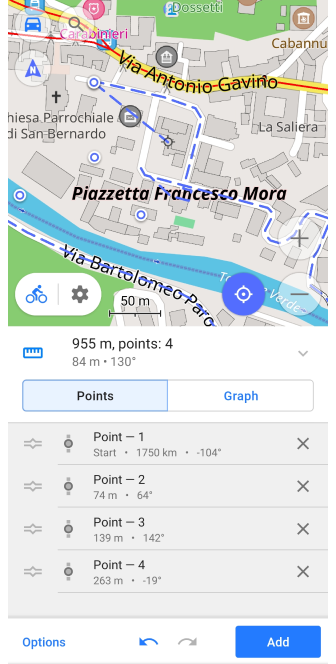
- Move the map to determine the distance and the azimuth. The information will be displayed in a field with a list of points below the map.
The Straight Line is needed and will be used for areas not covered by routing data, such as off-road and off-track areas.
Get Elevation Data
- Android
- iOS
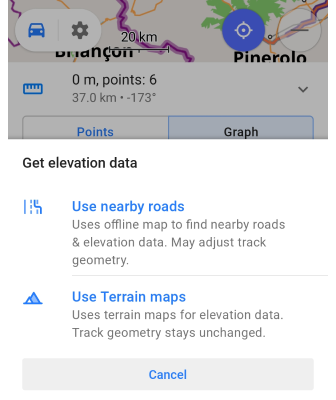
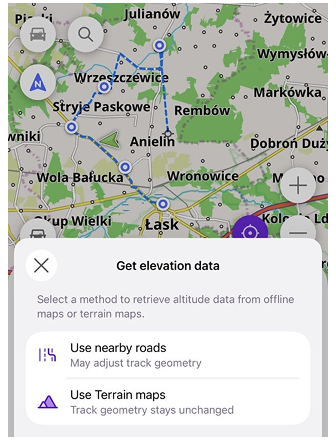
If Elevation data is missing in an existing track, it's possible to add it using the following tools:
- Use nearby roads. This mode uses offline maps to find the nearest roads to build a track, so elevation data will be retrieved from attached roads. The geometry of the track can be adjusted.
- Use Terrain maps. (OsmAnd Pro) Mode calculates altitude based on Terrain map data (3D). The difference between the altitudes recorded by your device can be used for elevation correction. The geometry of the track remains unchanged.
Online elevation correction (server-based) was removed in recent OsmAnd versions and is unavailable.
For older versions, it was deprecated and unreliable.
Use offline options instead: attach to roads or Terrain maps (Pro).
Attach Track to Roads
- Android
- iOS
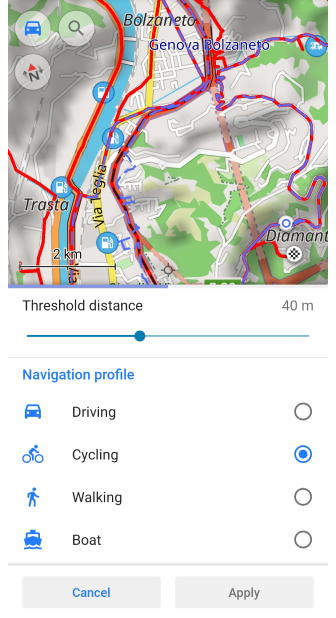
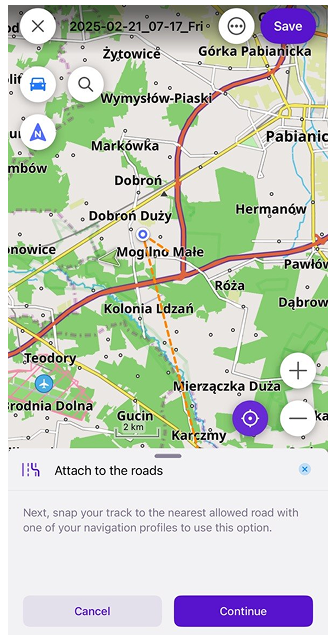
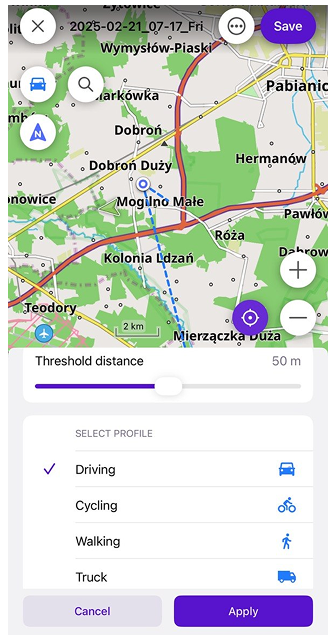
Attach to the roads setting allows attaching a recorded or an imported track to the roads from OsmAnd offline maps to get additional information:
- Correct turn information for Navigate by track (especially at roundabouts).
- Street names and lane information.
- Elevation data.
- Road attributes.
- Updated elevation profile based on road geometry.
- Possible recalculation of track geometry (simplifying or adjusting points to the road network).
When a track is attached to roads, the following parameters may change because the geometry and elevation of the track are recalculated: Distance, Ascent / Descent, Average speed (and the speed graph), Maximum speed, Time in motion, and Duration. These values may differ from the original GPX track if the recalculated road-based elevation or geometry significantly deviates from the recorded GPS data.
You can select a threshold value for the distance that simplified track points can be from the original track points.
If you select a track and the unspecified profile icon ("?") is displayed next to the Settings icon, tap on it to choose whether to attach the track to roads or just connect the points with a straight line and treat it as a recorded track.
Points & Segments
Adding Points
- Android
- iOS
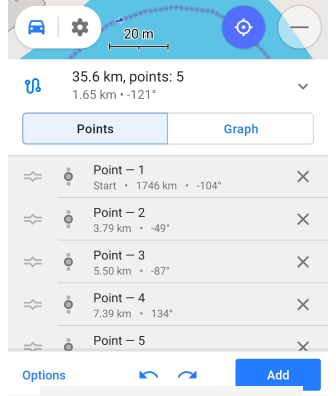
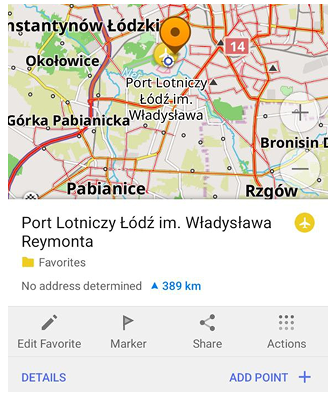
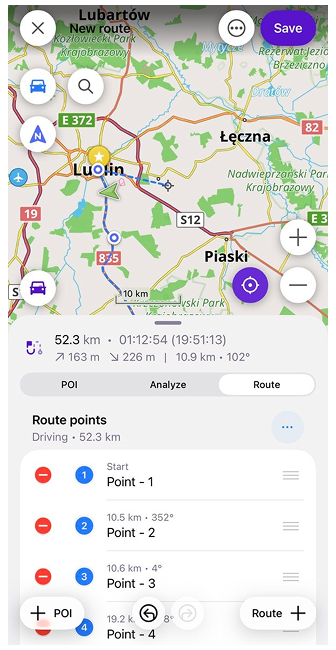
To measure a distance or plan a trip, add points at the Pointer location one by one and tap the Add button. By accessing the points list below, you can reorder points, delete, or access a specific point context menu.
You can also add a via point directly from the map by tapping a POI or Favorite to open its context menu and then tapping the ADD POINT. In this mode, context menus for non-point objects are not shown. When adding a POI/Favorite, its name is preserved as the route point name; if you later move this point on the map, the name is reset.
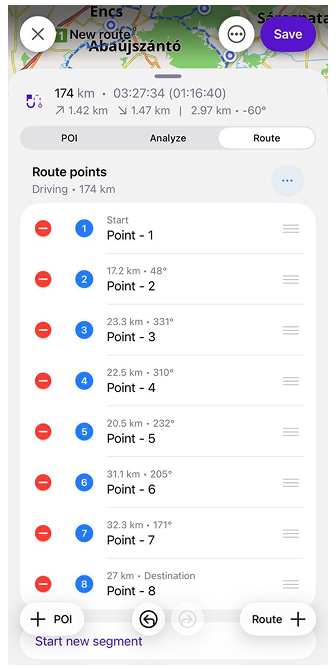
To measure a distance or plan a trip, add points at the Pointer location one by one and tap the Route + button. By accessing the points list below, you can reorder points, delete, or access a specific point context menu.
You can also Undo/Redo every action you made in the plan route.
Adding Waypoints (iOS only)
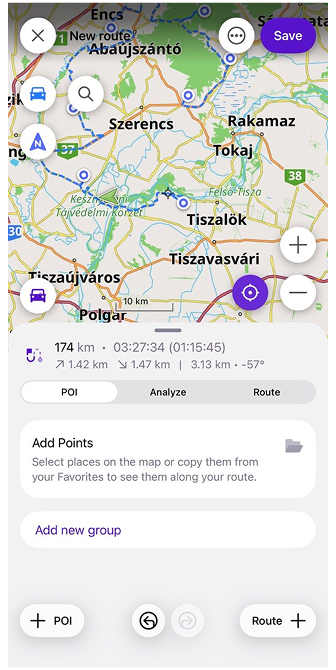
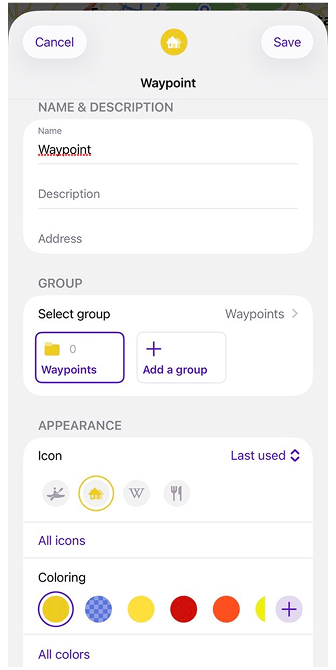
The POI tab allows you to add and manage waypoints while planning a route.
To add a waypoint, select a location on the map and tap the + POI button. The Waypoint screen opens, where you can enter a name, description, and address, select a group, and customize the icon, color, and shape. You can select an existing group or tap Add a group to create a new one.
The POI tab displays added points grouped by folders. Each group shows its name and the number of points it contains. For each group, tap the three-dot menu to access group actions:
- Rename — change the group name.
- Change appearance — change the group's appearance.
- Sort — change the order of points in the group.
- Delete — delete the group.
The Sort menu provides the following options: Last modified, Name A–Z, Name Z–A, Newest date first, and Oldest date first.
Tap a point in a group to open its context menu. You can:
- Edit — open the Edit Waypoint screen.
- Delete — remove the point from the group.
Route Between Points
- Android
- iOS
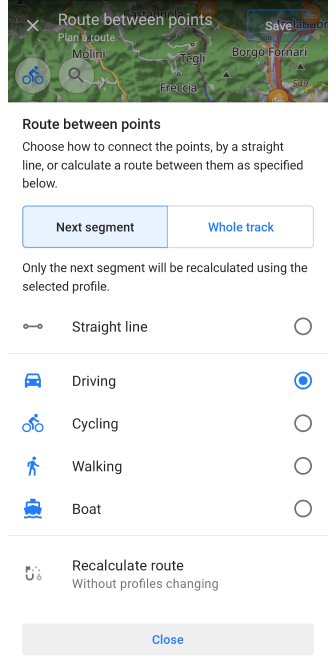
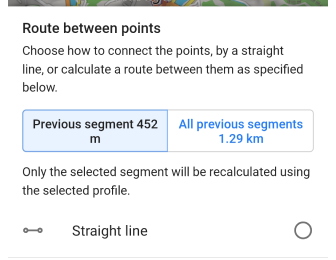
Added points in the editor could be connected as a straight line or as a route between points of a selected profile. Route between points can be accessed in several ways:
- From the Options menu → Route between points.
- Tap the profile icon in the bottom left corner of the map screen. Not on the top icon, will open the Configure Map menu.
- In the Point Context menu → Change route type before/after.
You can change route between 2 specific points or between multiple points:
- Whole track. The whole track will be recalculated using the selected profile.
- Next segment. Only the next segment will be recalculated using the selected profile.
- Change the Route Type Before/After Point. In the point context menu, you can change the way the route is calculated for the section from this point to the nearest or to the edge point. The setting provides information about the distance from this point to the beginning or the end of the route, or to the next/previous point.
- Recalculate routes. You can use route recalculation without changing the profile type. The profile icon shown on the planned route in the tool will not change, but the route type will match the selected one. You may need this to find alternative routes.
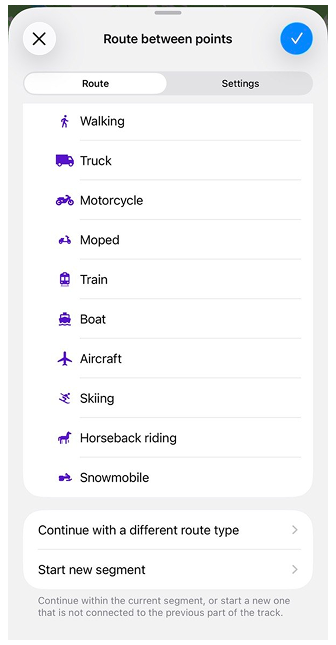
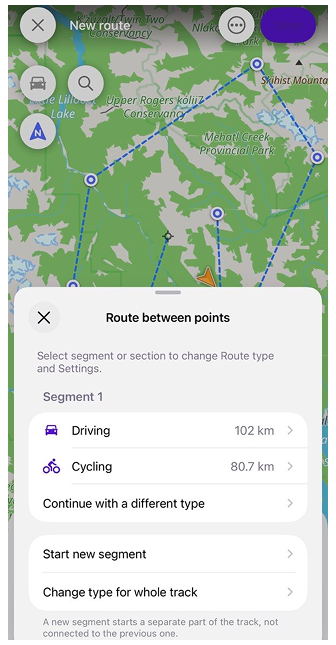
Added points can be connected with a straight line or a route calculated using a selected routing profile. The Route between points menu allows you to view and change the routing type and settings for route segments and sections.
You can open Route between points by tapping the Route between points button, which displays the icon of the currently selected routing profile, or from a Segment or Section menu.
In the Route tab, you can select a routing profile for the selected segment or section. Straight line is available as the first option, followed by the available routing profiles.
When the route has a single segment with one routing type, the simple Route between points view is displayed. When the route has several segments or a segment with multiple routing types, the complex view shows all segments and sections, allowing you to select which part of the route to modify.
You can also:
- Continue with a different route type — select a routing type for the next section of the current segment, then continue adding points on the map. In the complex view, this option is called Continue with a different type and is displayed under the last segment.
- Start new segment — create a new segment that is not connected to the previous part of the track. Select a routing type for the new segment, then continue adding points on the map.
- Change type for whole track — available in the complex view. Select a routing type to apply to the entire track.
In the Settings tab, you can select predefined routing settings for the selected route type.
Segments
- Android
- iOS
A track segment is a collection of points connected without gaps. In a plan route tool, it's possible:
- To merge segments: Join segments option removes the gap to previously separated segments.
- To split or create new, unconnected sections of a track. To create one, use the Start new segment option or select the Split feature from the Point context menu.
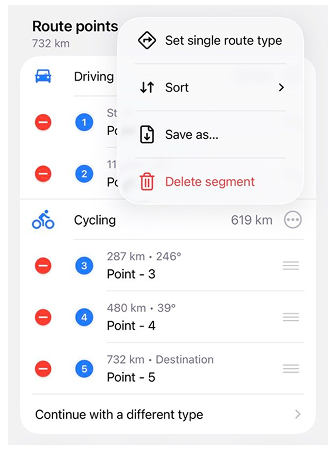
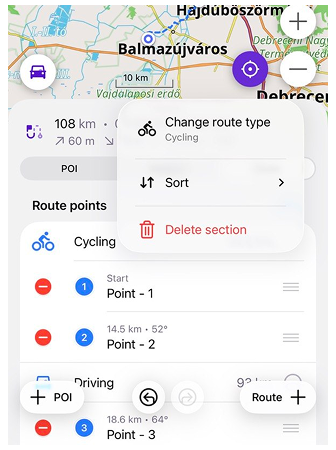
A route can contain one or more segments. A segment can use a single route type or contain multiple sections with different route types.
In the Route tab, each segment is displayed with its route type and distance. When a segment contains multiple sections, each section displays its route type and distance.
You can manage a segment using its three-dot menu:
- Change route type — available for a segment with a single route type. Opens Route between points, where you can select a different route type.
- Set single route type — available when a segment contains multiple sections with different route types. Opens Route between points, where you can apply one route type to the segment. The whole segment is recalculated using the selected routing type.
- Sort — reorder route points manually or use Sort door-to-door to reorder them to minimize the total travel distance.
- Save as… — save the segment as a separate file.
- Delete segment — delete the segment.
To create a new unconnected segment, tap Start new segment at the bottom of the Route tab. To continue the current segment with a different routing type, tap Continue with a different type under the last segment, then select a routing type for the next section.
A segment can be divided into sections when different route types are used for different parts of the segment. Each section displays its route type and distance.
Tap the three-dot menu for a section to:
- Change route type — open Route between points and select another route type.
- Sort — access the available sorting options.
- Delete section — remove the section.
Point Context Menu
- Android
- iOS
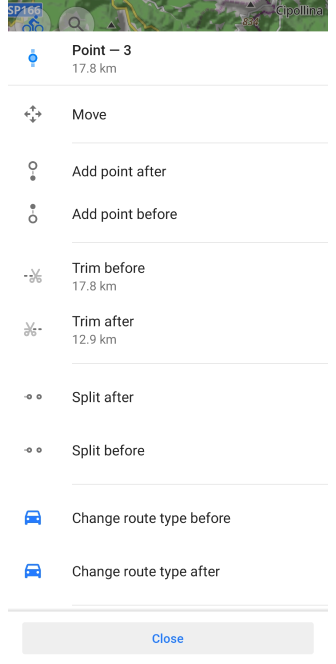
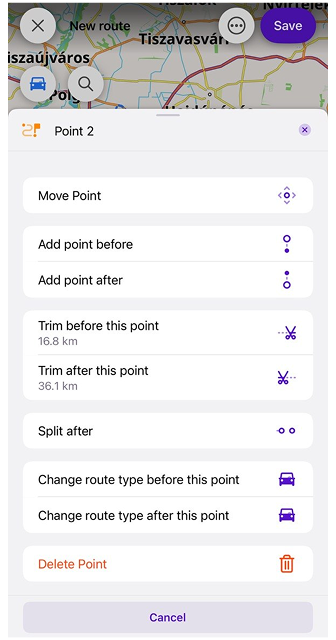
Each point on your route has its context menu. It shows the sequence number of the point, the distance from the start of the route, the function to move it on the map and remove it, and a set of actions with sections of the route before and after this point. To edit, tap the required point in the list of points or directly on the map.
-
Information about the point. The number of points in the list. The distance to the first point is based on the routing type set, the distance may change when recalculated to the new type if the Route between points parameter is changed.
-
Move Point. Allows you to change the position of a point on the map. Move the map using gestures to change the location of the point. The point indicator will be in the center of the visible part of the map.
-
Add point after. Move the map to add a point after the selected point. You can add as many points as you need until you tap cancel or apply.
-
Add point before. Move the map to add as many points as necessary after the selected point on the segment between this point and the next one.
-
Trim before this point. You can trim the whole section of the route, points, and segments, from its start to the selected point. The distance to be trimmed is indicated under the option name.
-
Trim after this point. You can trim a route, points, and segments, from the last point added to the selected point. The distance to be trimmed is indicated under the option name.
-
Split before. Allows to split the route before the selected point into separate, unconnected segments.
-
Split after. Allows to split the route after the selected point into separate, unconnected segments.
-
Join segments. The last point on one of the split segments and the next in the list of points on the other segment have this connection setting.
-
Change route type before this point. You can change the routing type configured for an available profile, between points on the previous segment, or for all segments from the start of the route to the selected point.
-
Change route type after this point. You can change the routing type between points on the next segment, or for all segments from the selected point to the last added point.
-
Delete Point. Remove the selected point from the route. Similar to deleting a point in a list.
Multimodal Routes
- Android
- iOS
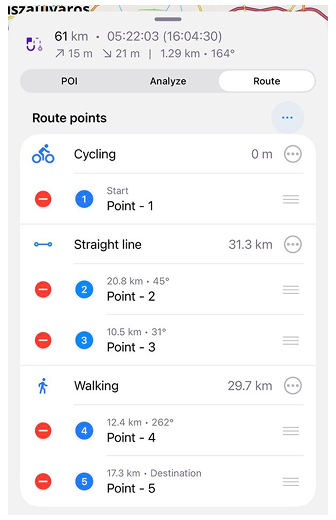
Using the Plan a Route tool and the Route between points option, you can create multimodal routes where, for example, the first part can be a cycling route, the second part a straight line route and then a pedestrian one. Note that navigation on multimodal routes is not available, so you need to select one of the most suitable profiles to be able to follow the turn-by-turn instructions.
Editor
Save Route
- Android
- iOS
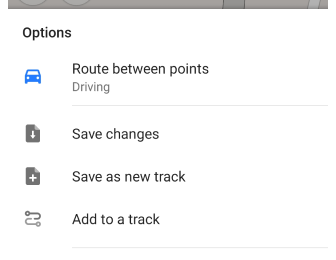
After you have added at least one point to the map, you can use the save option. All tracks saved in Plane a route can be found in the main Menu → My Places → Tracks.
There are four ways to save:
- Quick save. The upper right Done (for existing tracks) button allows quick saving of changes and exiting the Plan a Route tool. The name is generated based on the current date.
- Save changes in Options menu allows you to save changes to a file and continue planning the route.
- Save as new track in the Options menu opens a dialog where you specify the name of the track and the folder where the route will be saved.
- Add changes to a track. Attaches a created track as a separate segment to another existing track. Changes to a selected track cannot be undone.
When saving, the track inherits the activity type of the routing profile used for planning. The activity is saved in the track metadata and is preserved after exporting or importing the GPX file.
When saving a new track, you can select the Simplified track option to make the track compatible with other third-party applications. Technically, the track will be saved without route instructions as a purely geometric track.
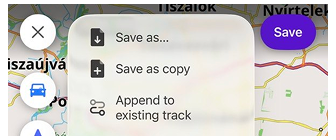
After you have added at least one point to the map, you can use the save option. All tracks saved in Plane a route can be found in the main Menu → My Places → Tracks.
For a new route, tap Save in the top toolbar to save the current track. You can also use Save as… from the Options menu to enter a file name and save the route.
When editing an existing track, Save saves the current changes. You can also use the following options:
- Save as… — saves the track with a new file name.
- Save as copy — saves a duplicate of the track.
- Append to existing track — adds the planned track as a separate segment to an existing track.
When saving, the track inherits the activity type of the routing profile used for planning. The activity is saved in the track metadata and is preserved after exporting or importing the GPX file.
Options
- Android
- iOS
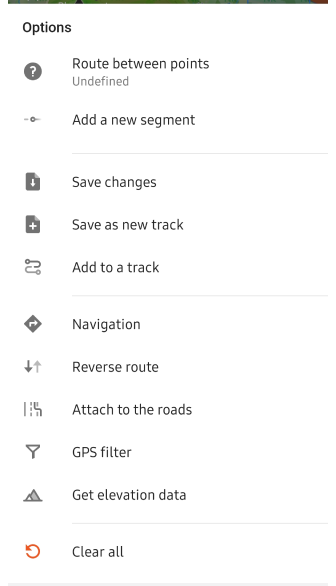
- Route between points. Shows the selected application profile (default is a straight line). Tapping this action is the same as tapping the Profile button, which opens the application profile menu.
- Start new segment (iOS) or Add a new segment (Android). Draws new route segments that do not connect to the previous segment.
- Save changes. If it is a new track without linking to the existing one, the Save as new track menu opens. When you add new segments to an opened or imported track, the notification about saving the GPS file to the storage appears, after which you can continue to create the next segment.
- Save as new track. Saves your route like the GPX track.
- Add to a track. Add your route to a track from your track folder and save the new track.
- Navigation. Starts navigation from your position to the finish point using a drawn route.
- Reverse route. You swap the Start point of the route and the last added point. The route segment settings do not change when Reverse is applied.
- Attach to the roads. Creates an approximate route. Each point on the track is matched to the nearest permitted road on the map according to the selected profile and threshold distance.
- GPS filter (Android only). You can filter out route points that do not match the selected routing type, delete unnecessary data, or correct inaccurate data. GPS filter will only work if the routing type is specified as Straight Line.
- Get elevation data (Android only). This option is only displayed in the menu if no elevation data is available. With this option, you can calculate altitude using Terrain map data or use data from downloaded maps to find the nearby roads.
- Clear all. It archives completely all your actions. An "artifact" remains on the map - the dotted lines of the just cleared route. It disappears at the next, adding new points. You can cancel the Clear All function with the Return Action button. The feature does not affect the unchanged parts of the routes opened in the tool.
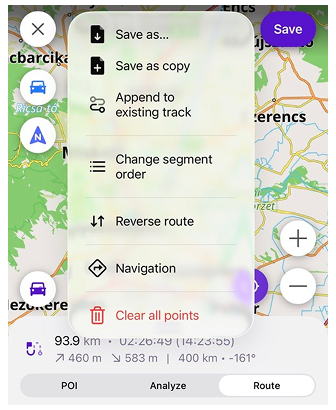
Tap the three-dot menu in the top toolbar to open the Options menu. The available actions depend on whether you are creating a new route or editing an existing track.
- Save as… — save the route with a new file name. Available for both new routes and edited tracks.
- Save as copy — save a duplicate of an existing track. Available when editing an existing track.
- Append to existing track — add the planned route as a separate segment to an existing track.
- Change segment order — change the order of route segments.
- Reverse route — reverse the direction of the route.
- Navigation — close Plan a route and start navigation using the planned route.
- Clear all points — remove all points from the planned route.
Graph / Analyze
- Android
- iOS
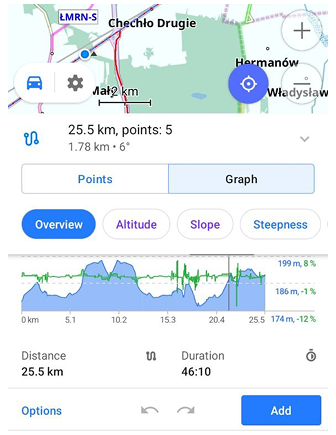
During route planning, the graph displays route altitude and slope percentage information, plus you can tap anywhere on the graph to display a pointer with particular data.
The graph is displayed in the Graph tab when creating or opening a track, and when Navigation using Plan a route.
When calculating a route for navigation in Plan a route, you can find out additional track information such as Elevation info and Road attributes, and use the Analyze on map tool. Tap the Details button below the graph.
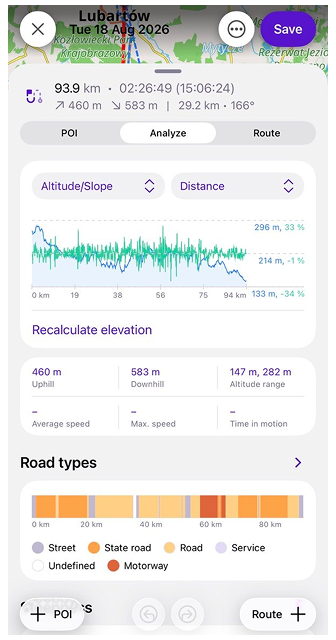
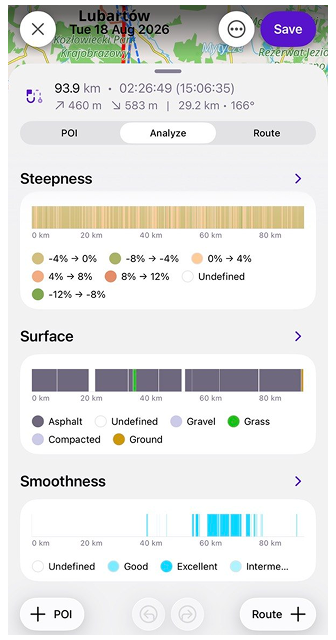
The Overview section displays a graph based on the selected axis. Use the axis selection controls to choose the data displayed on the graph. Recalculate elevation allows you to recalculate elevation data when needed. If elevation data is unavailable, the Analyze tab displays No elevation data. The message explains that OsmAnd can retrieve elevation data from nearby roads or terrain maps. Tap Get elevation data to calculate elevation data. For more information, see Get Elevation Data section.
The Overview Statistics section displays Uphill, Downhill, Altitude range, Average speed, Max. speed, and Time in motion. A dash – is displayed when data is unavailable. For example, speed and time in motion may be unavailable for planned routes.
The Road Types, Steepness, Surface, and Smoothness sections show the corresponding route characteristics. Tap a section to expand it and view detailed information in the legend.