Navigate by Track
Overview
The Navigation by track (GPX) option allows you to follow a predefined route or track on a map. It can be particularly useful for outdoor activities such as hiking, cycling, or off-road driving, where having a planned route improves safety and efficiency. If you are traveling in an organized group, this feature helps you and each member of the group have the same route information as the others.
The Navigation by track option can also be used in the everyday life. You can use a previously recorded track or create a track and share it with your family or friends instead of explaining the route to them. You can also use the routes on the OsmAnd map for navigation. How to highlight them on the map and what their colors mean is described in the Routes section of the Vector maps article.
- Android
- iOS
Select the Track
Before using the Navigation by track option, you need to display the track on the map. OsmAnd supports track as a line (Geometry) and track as a route (Route) or combination of them (OsmAnd by Plan route). If you have a track as a collection Waypoints, you can use Markers navigation.
-
Geometry track will have very basic navigation by default and won't provide accurate turns, street names and turn lanes. To get missing information, you need to use Attach to the roads tool.
-
Route track will calculate route between route points by selected profile. Basically, all route points will be considered as intermediate points. If you route consists > 50 points, it's very likely that it's misconfigured Geometry track.
-
OsmAnd track consists of both geometry and route parts, and it's suitable to provide exactly the same guidance as navigation by default. These tracks are produced by Plan route or Web version. It's possible to resave this track to Geometry only track as Simplified to be used in 3rd party programs.
Start GPX Navigation
- Android
- iOS
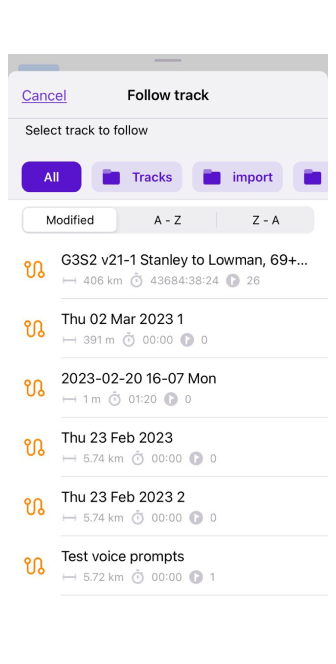
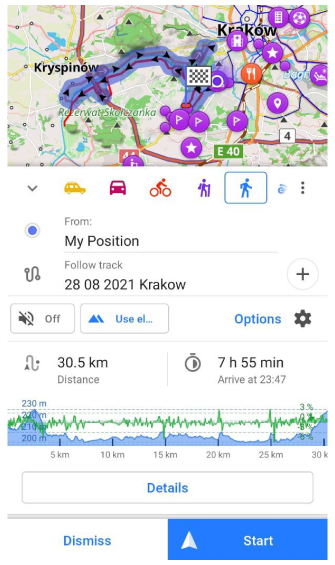
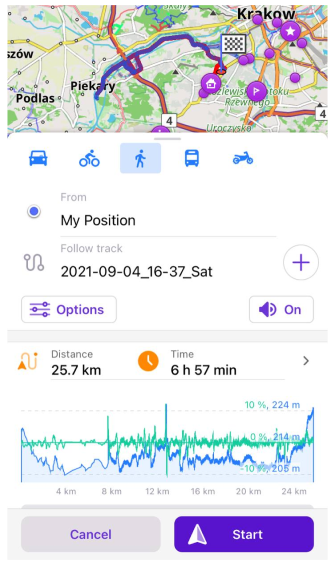
Navigation on a track can be started using the quick action button in the track context menu (opened by selecting one of the highlighted tracks on the map, or by tapping a track file in the My Places section of the Main Menu) or from the navigation menu, which is opened by tapping:
- Navigation button on the map screen.
- Navigation section in the Main Menu (Menu → Navigation).
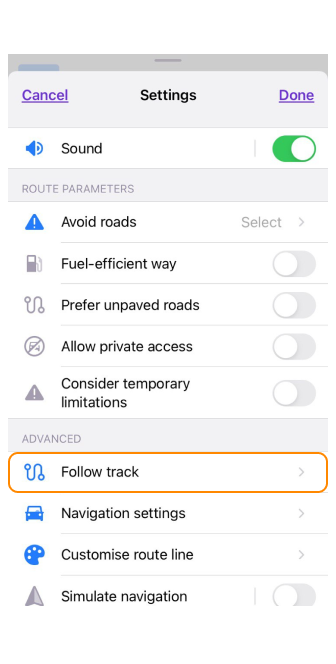
- In the Navigation menu go to Settings → Follow track.
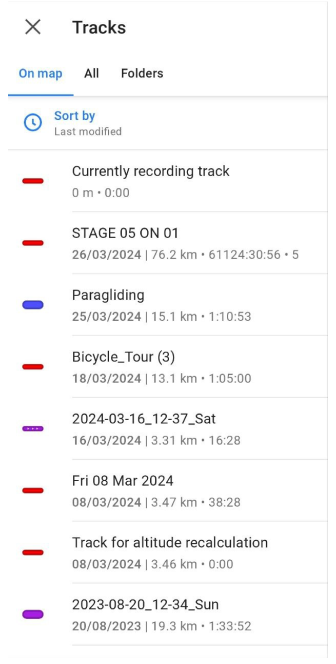
Choose Segments
- Android
- iOS
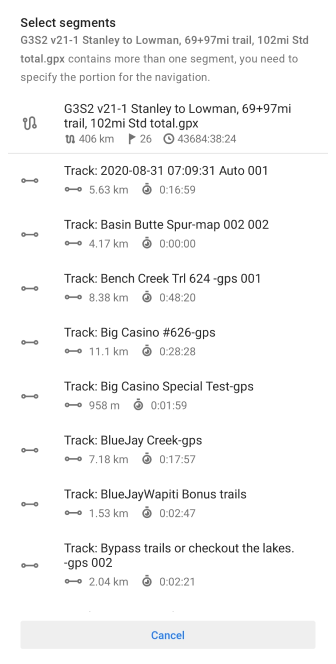
For navigation, if the selected track consists of multiple segments or tracks, you can select either a specific segment or the entire GPX track file. When importing you can choose whether to save it in a single file or in multiple files.
Follow Track options
- Android
- iOS
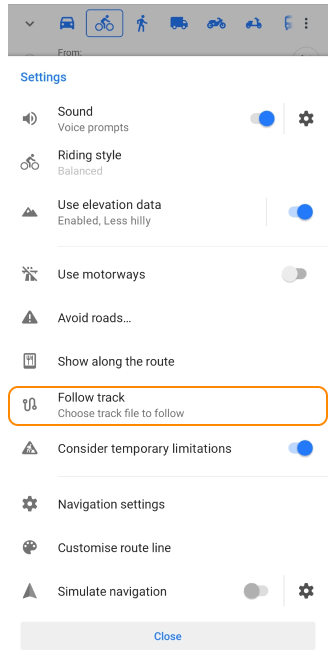
- Navigation → Settings → Follow track
- Tracks Context menu → Options → Follow track

Go to: Navigation → Settings → Follow track

- Edit (pencil icon next to the track name) — Opens the track in the Plan a route tool.
- Select another track — Select a different GPX file for navigation.
- Reverse track direction — If this setting is enabled, the direction of movement along the track is reversed.
- Attach to the roads — Configures attaching a track to the roads.
- Point of the track to navigate (Android) / Navigate to (iOS) — You can select how to navigate from my location to the track: to the Start of the track or to the Nearest point on the track.
- Choose Navigation type for the first and last segment: either build a straight line or use the routing type from the current profile.
Attach to the Roads
- Android
- iOS


The Attach to the roads feature aligns your track with the nearest road for a more accurate navigation experience. Available in the Follow track menu, this feature ensures that your route follows the appropriate road network based on the selected navigation profile and threshold distance. This enhances both route details and voice instructions during navigation.
How it works:
- OsmAnd matches each track point to the nearest road within the set threshold distance (default: 50 meters).
- The threshold distance defines the maximum allowable distance between a GPS track point and a road for attachment.
- Automatic reattachment — When switching navigation profiles, OsmAnd automatically reattaches the track to roads that are suitable for the new profile.
- For large tracks with many points, the attachment process may take a little longer. You will see a progress indicator (orange status line) showing the attachment status.
- After the attachment is complete, tap Apply to use the modified track for navigation.
Automatic Attachment to the Roads
OsmAnd automatically snaps routes to roads when using the Plan a Route tool:
- Waypoints automatically align with the nearest available road (except for Straight Line Routing and Direct-to-Point Routing).
- If no roads are detected (e.g., in off-road environments), the route will follow straight-line segments.
- You can manually adjust the route by dragging waypoints to different locations.
By default, the Attach to the roads feature runs automatically when a track is selected for navigation. You can change this setting as needed. For more details, refer to Detailed Track Guidance in the Navigation Settings article.
Points
Start / Finish Point
You can specify the start and finish point for a route other than the start/finish specified in the GPX file. Just change it the same as you do for Navigation.
In the Follow track menu, you can choose whether you want to navigate from your current location to the start point of the track or to the nearest point on the GPX track. Also, you can choose Navigation type that will be used for the start and end segment of your route.
Waypoints
If the track has waypoints, you can use Show along the route and Voice guidance to get notified about Points of Interests. You can add Waypoints to an existing track via Context menu, track need to be visible on the map.
Intermediate Points
When preparing or navigating a GPX track, you cannot add intermediate places you plan to drive through within that track. You can only assign start and finish points in addition to the track or segment you are planning to follow.
Guidance
Navigation by GPX track contains the same voice instructions as route navigation. However, some turns or traffic circles may not be interpreted correctly because there is no information about road intersections in GPX, except for GPX files created by OsmAnd. To eliminate these problems, you should use the sAttach to the roads feature.
During navigation, you can use various options such as zooming in or out, panning the map, or switching to a different map style. If you deviate from the track, OsmAnd will automatically recalculate the route to bring you back on track. You can also adjust the speed of the track and set audible alerts for approaching points or deviations from the route.
Related Articles
- Route parameters
- Route preparation
- Route details
- Navigation by markers
- Navigation settings
- Map screen during navigation
- Voice prompts / Notifications
- Android Auto
- CarPlay
Last updated: April 2025